Pilot Light

How to Safely Relight Your Pilot Light

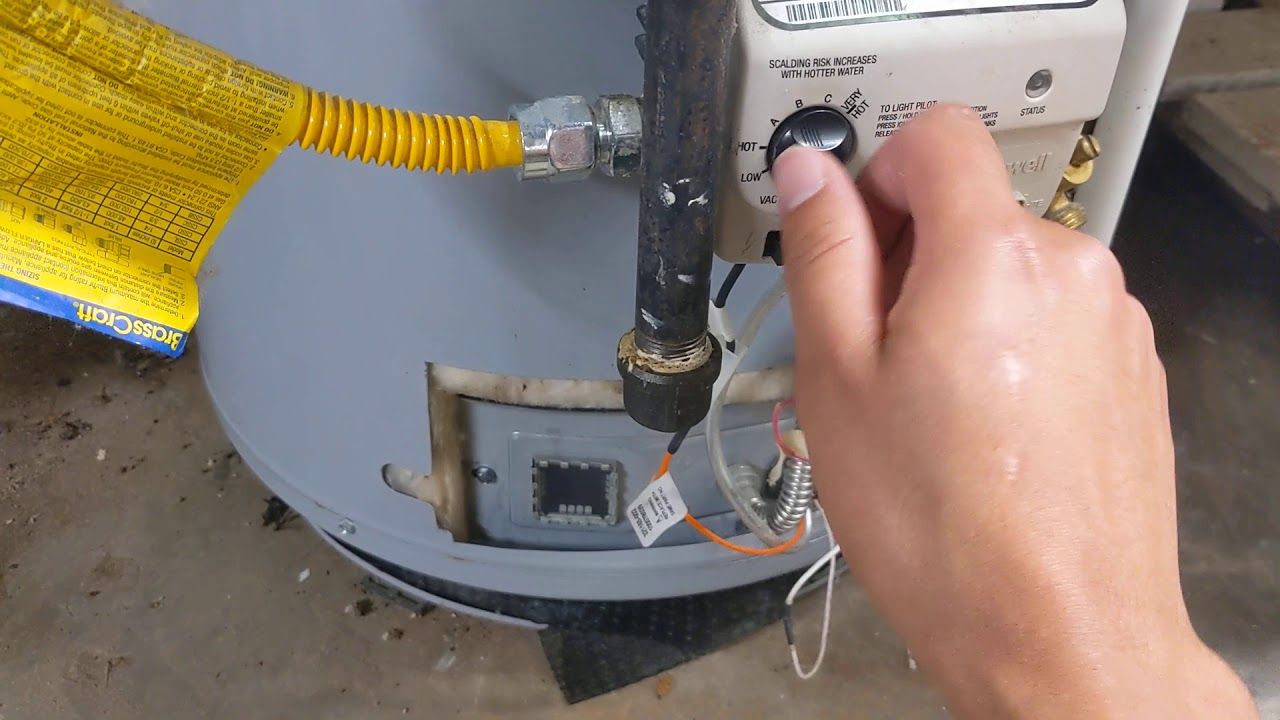
Understanding how to safely relight your pilot light is crucial for homeowners and DIY enthusiasts.

This knowledge can prevent potential gas leaks and accidents. It also helps maintain the efficiency of appliances like water heaters, furnaces, and gas stoves.

In this guide, we'll provide clear, step-by-step instructions on relighting a pilot light. We'll also address common issues, such as a water heater pilot light that keeps going out, and how to troubleshoot the pilot assembly.

Understanding Pilot Light Safety

A pilot light is a small flame that ignites the main burner in gas appliances.

It's crucial to handle this component with care. Mishandling can lead to gas leaks or even explosions.

Knowing how to safely relight your pilot is a key aspect of home maintenance.

This knowledge can help you avoid potential hazards and ensure the efficient operation of your appliances.

Broken Arrow Plumber

Preparing to Relight!

Before you start, locate the assembly. It's usually found behind a panel or door on your appliance.

Safety is paramount. Always turn off the gas supply before you begin.

Wait for a few minutes to let any residual gas dissipate. This step is crucial to prevent any accidental ignition.

Identify the reset button on your appliance. It's typically red or marked with an "R".

Remember, each appliance is different. Always refer to the manufacturer's instructions for specific guidance.

Step-by-Step Guide to Relighting Your Pilot Light

First, hold down the reset button. While doing this, light the pilot.

You can use a long match or a lighter with a long nozzle. This helps keep your hand away from the flame.

Continue holding the reset button for about a minute after lighting the pilot. This allows the thermocouple to heat up.

If the pilot light stays lit when you release the reset button, you've done it right. You should see a steady blue flame.

If the pilot light goes out, repeat the process. Sometimes it takes a few tries.

Remember, if the pilot light won't stay lit, there could be other issues. This leads us to troubleshooting.

Here's a quick recap of the steps:

  1. Locate the pilot light assembly.
  2. Turn off the gas and wait for it to dissipate.
  3. Hold down the reset button and light the pilot.
  4. Keep holding the reset button for about a minute.
  5. Release the reset button and check the pilot light.

If you've followed these steps and the pilot light is still not staying lit, it's time to troubleshoot

Water heater Repair

Troubleshooting: When Your Water Heater Pilot Keeps Going Out

If your water heater pilot light keeps going out, it's a sign of a problem.

One common issue is a faulty thermocouple. This device senses when the pilot light is on. If it's not working, it can shut off the gas supply.

Another issue could be a dirty pilot assembly. Dirt and debris can block the gas flow.

Drafts or airflow issues can also cause the pilot to extinguish. Check for drafts near your appliance.

When to Call a Broken Arrow Plumber

If you've tried the steps above and your pilot light still won't stay lit, it's time to call a professional.

Remember, working with gas appliances can be dangerous. If you're unsure, it's always best to seek expert help at Spot On Plumbing of Broken Arrow Plumbers

Plumbers Broken Arrow

Maintaining Pilot Light Safety

Understanding pilot light safety is crucial for any homeowner. Regular maintenance and vigilance can prevent potential hazards.

If you notice your water heater pilot light keeps going out, don't ignore it. It could be a sign of a larger issue.

Remember, when in doubt, always consult a Broken Arrow Plumber. Safety should always be your top priority.